
MY JOBS
Introduction To My Jobs
The My Jobs blade is a list of all Jobs that have been assigned to a User or selected by a User. The status of a Job will be either system status ‘Active’ or a custom status.
There are three types of Jobs:
- Regular jobs (represented in the list by a white circle)
- Scheduled jobs (represented in the list by a circle and clock.)
- Gigs (represented in the list by a dotted circle)
![]() A Gig is an often used, repeatable, typically simple process – for example, a leave request
A Gig is an often used, repeatable, typically simple process – for example, a leave request
The My Jobs list displays details for all Jobs that have Tasks allocated for the User to complete. This list can also be exported in PDF or Excel format.
These details include:
- Job Name
- Launch Date
- Function Group
- Task
- Type
- Status
- Priority (1 to 5 – 1 is the lowest and 5 the highest) and % completion.
Working On A Task
- Click the Job you want to work on in the Jobs | My Jobs blade to open the Job blade
- The Job blade provides an overview of the Job including;
- Template Name, Job Name and Job Description.
- The current Job status.
- The current priority level.
- The current Task (indicated by a color task icon) as well as the overall Job Flowchart.
- Status bars for the Job.
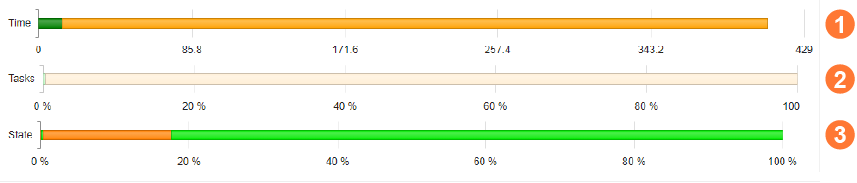
![]() Time taken (in relation to set estimates, if applicable)
Time taken (in relation to set estimates, if applicable)
![]() Overall task completion %
Overall task completion %
![]() State Overview (indicates % of time the task has been in each state)
State Overview (indicates % of time the task has been in each state)
Actions available within the Job blade:
1. Change Status ![]()
Click to manually change the status of a Job.
2. Task Actions ![]()
Click to open the Task Actions blade
Displays two tabs;
General – This tab details pre-set notes that are applicable to this Task, for example, instructions or contact information for a member of staff.
Temporary Task Notes – This tab allows the User to take temporary notes while working on the task. To add a Temporary Task Note, type within the Notes field and click the Save icon ![]() .
.
![]() Temporary Task Notes are not saved and are removed once the job has moved to another task.
Temporary Task Notes are not saved and are removed once the job has moved to another task.
3. Job Log ![]()
The Job Log blade displays the history of the Job since it’s creation and can be accessed by clicking Job Log icon.
Users with appropriate administrative Permissions can also manually add notes into the Job Log by clicking the Add Job Note icon ![]() .
.
4. Return To Job Pool ![]()
This option returns the Job back to the Job Pool without progressing the Job.
5. Next Task ![]()
This option progresses the Job to the next task.
The Task Step blade will open prompting the user to choose which Task to progress to.
From the drop-down list under the Step tab, select the Task and then click the Save icon![]() .
.
![]() Retaining A Job
Retaining A Job
After selecting the next Task within the Task Step blade users can choose whether the Task should be retained by the User.
By clicking the box for ‘Retain job and accept next task’ the User will keep control of the next step in the Job Flowchart (if they have the appropriate Permissions and access).
If the box is not ticked, the Job is released back in the Job Pool.
Creating A Gig
A Gig is an often used, repeatable and typically simple process that can be created quickly.
Gigs negate the need to go through the Job Preparation and Job Launch stages. Once a Gig has been created by a User it will appear in the My Jobs list immediately.
- To create a Gig, click the New Gig icon
 in the My Jobs blade.
 - Select a Job Template from the Job Template Selection blade.
- To filter Job Templates click the Show Template Filter icon.
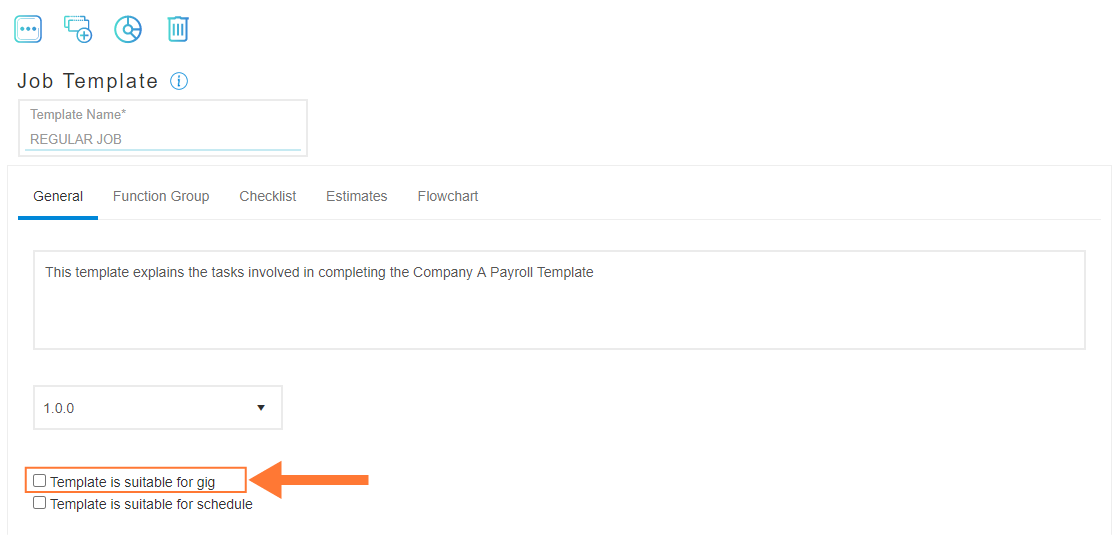
![]() Job Templates will only show in this list if;
Job Templates will only show in this list if;
A) The Job Template has been specified as Template Is Suitable For Gig within the Jobs | Job Template Folder | Job Template blade will be made available to be created as Gigs and,
B) And the User is a member of the required Function Group (as specified in the Job Template settings).
4. To confirm the selection of the Job Template, select the Template and then click the Assign Job Template icon ![]() .
.
5. This will open the Create New Gig blade which displays:
-
-
- The Template Name (this name cannot be edited)
- Gig Name
- General > Gig Description
- Flowchart (this cannot be edited)
-
6. When all the settings have been filled, click the Release & Launch Gig icon.
7. In the confirmation box, click Release.
8. The Gig will now appear in your My Jobs list
MY JOBS
Introduction To My Jobs
The My Jobs blade is a list of all Jobs that have been assigned to a User or selected by a User. The status of a Job will be either system status ‘Active’ or a custom status.
There are three types of Jobs:
- Regular jobs (represented in the list by a white circle)
- Scheduled jobs (represented in the list by a circle and clock.)
- Gigs (represented in the list by a dotted circle)
![]() A Gig is an often used, repeatable, typically simple process – for example, a leave request
A Gig is an often used, repeatable, typically simple process – for example, a leave request
The My Jobs list displays details for all Jobs that have Tasks allocated for the User to complete. This list can also be exported in PDF or Excel format.
These details include:
- Job Name
- Launch Date
- Function Group
- Task
- Type
- Status
- Priority (1 to 5 – 1 is the lowest and 5 the highest) and % completion.
Working On A Task
- Click the Job you want to work on in the Jobs | My Jobs blade to open the Job blade
- The Job blade provides an overview of the Job including;
- Template Name, Job Name and Job Description.
- The current Job status.
- The current priority level.
- The current Task (indicated by a color task icon) as well as the overall Job Flowchart.
- Status bars for the Job.
![]() Time taken (in relation to set estimates, if applicable)
Time taken (in relation to set estimates, if applicable)
![]() Overall task completion %
Overall task completion %
![]() State Overview (indicates % of time the task has been in each state)
State Overview (indicates % of time the task has been in each state)
Actions available within the Job blade:
1. Change Status ![]()
Click to manually change the status of a Job.
2. Task Actions ![]()
Click to open the Task Actions blade
Displays two tabs;
General – This tab details pre-set notes that are applicable to this Task, for example, instructions or contact information for a member of staff.
Temporary Task Notes – This tab allows the User to take temporary notes while working on the task. To add a Temporary Task Note, type within the Notes field and click the Save icon ![]() .
.
![]() Temporary Task Notes are not saved and are removed once the job has moved to another task.
Temporary Task Notes are not saved and are removed once the job has moved to another task.
3. Job Log ![]()
The Job Log blade displays the history of the Job since it’s creation and can be accessed by clicking Job Log icon.
Users with appropriate administrative Permissions can also manually add notes into the Job Log by clicking the Add Job Note icon ![]() .
.
4. Return To Job Pool ![]()
This option returns the Job back to the Job Pool without progressing the Job.
5. Next Task ![]()
This option progresses the Job to the next task.
The Task Step blade will open prompting the user to choose which Task to progress to.
From the drop-down list under the Step tab, select the Task and then click the Save icon![]() .
.
![]() Retaining A Job
Retaining A Job
After selecting the next Task within the Task Step blade users can choose whether the Task should be retained by the User.
By clicking the box for ‘Retain job and accept next task’ the User will keep control of the next step in the Job Flowchart (if they have the appropriate Permissions and access).
If the box is not ticked, the Job is released back in the Job Pool.
Creating A Gig
A Gig is an often used, repeatable and typically simple process that can be created quickly.
Gigs negate the need to go through the Job Preparation and Job Launch stages. Once a Gig has been created by a User it will appear in the My Jobs list immediately.
- To create a Gig, click the New Gig icon in the My Jobs blade.
- Select a Job Template from the Job Template Selection blade.
- To filter Job Templates click the Show Template Filter icon.
![]() Job Templates will only show in this list if;
Job Templates will only show in this list if;
A) The Job Template has been specified as Template Is Suitable For Gig within the Jobs | Job Template Folder | Job Template blade will be made available to be created as Gigs and,
B) And the User is a member of the required Function Group (as specified in the Job Template settings).
4. To confirm the selection of the Job Template, select the Template and then click the Assign Job Template icon ![]() .
.
5. This will open the Create New Gig blade which displays:
-
-
- The Template Name (this name cannot be edited)
- Gig Name
- General > Gig Description
- Flowchart (this cannot be edited)
-
6. When all the settings have been filled, click the Release & Launch Gig icon.
7. In the confirmation box, click Release.
8. The Gig will now appear in your My Jobs list