
NODE CONTROLS
The Node Menu
Once a node has been added to a Data Model, right-clicking the node will display the Node Menu.
Controls within the Node Menu include:
- Accessing the spreadsheet functionality within the Node.
- Editing Node properties.
- Adding files to the Node.
- Duplicating the Node.
- Repositioning the Node within the Data Model.

![]() Data
Data
Each Node has four spreadsheet tabs. Each spreadsheet is comprised of 100 rows with columns ranging from A to Z (2600 cells in total).
Spreadsheets can be exported to Excel by clicking the Export to Excel icon within the Data blade.
![]() After entering data into a tab, users must click the Save icon
After entering data into a tab, users must click the Save icon ![]() otherwise all changes will be lost.
otherwise all changes will be lost.
![]() Node Management
Node Management
Each node has a Node Management blade that can be used to edit a Nodes‘ properties, Permissions and appearance.
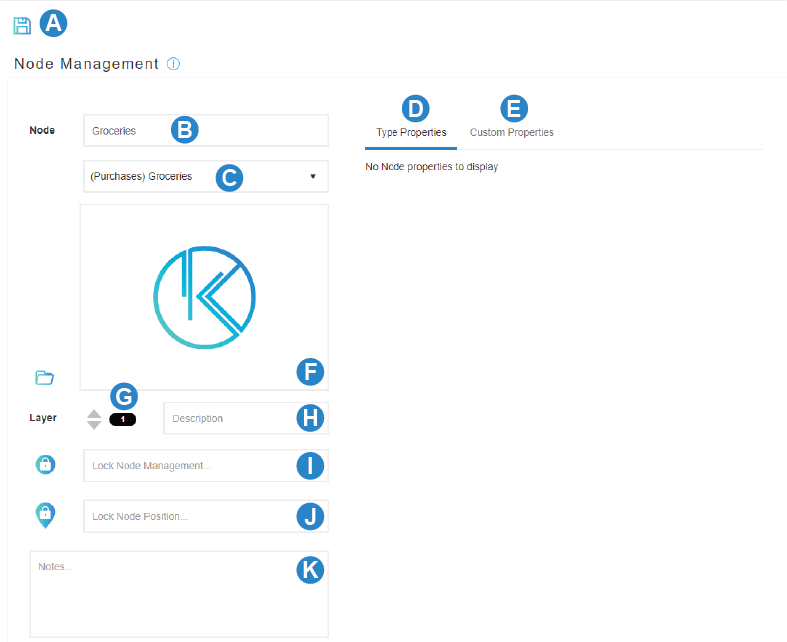
![]() Save icon
Save icon
![]() Node name
Node name
![]() Change Node Type
Change Node Type
This drop-down list allows Users to change the Node’s Type. Note changing the Node Type does not change the name of the Node.
![]() Node Type Properties
Node Type Properties
Displays the Node properties that have been defined on the Node Builder blade. Property values highlighted by a red text box are required fields. A red Node status mark is displayed adjacent to a Node if a required field is not populated.
![]() Custom Properties
Custom Properties
Users can add custom property names and values for each Node.
![]() Node Image
Node Image
Select and display an image for the Node by clicking Load Image. The image selected from the Image Gallery is displayed.
Click the Choose icon to select a new Node image.
![]() Layer Controls
Layer Controls
Edit the Layer assigned to the Node.
![]() Node Description
Node Description
Add/edit a description for the Node
![]() Lock Node Management
Lock Node Management
Prevent editing of fields on the Node Management blade by selecting Lock Node Management. Editing rights are assigned by selecting at least two and no more than three ‘User’ names. A blue Node status mark is displayed adjacent to a Node that has been locked. An ‘Admin’ username can always be selected and added to the list. When no names are present, all fields on the Node Management blade are editable. The Notes field is always editable.
![]() Lock Node Position
Lock Node Position
Fix the position of the Node relative to other nodes within the Workspace by selecting Lock Node Position. Choose at least two and no more than three ‘User’ names. The lock icon on the Node menu is shown as closed to all Users whose name does not appear in the Lock Node Position field. An ‘Admin’ username can always be selected and added to the list. When no names are present, all Users can fix the position of the Node.
![]() Notes
Notes
The Notes field enables Users to leave comments. When content is saved to the Notes field a yellow status mark is displayed adjacent to a Node. Clearing the content clears the mark.
![]() Files
Files
The names of files that have been uploaded to a Node are listed on the Files blade. Selecting a file from the list of files opens a Document Preview blade.
Document Preview is limited to files that are less than 5MB in size. A ‘Preview Unavailable’ message is displayed for file types that are not supported.
- Click the Upload icon to open the Upload Files blade.
- Download selected files by clicking the Download icon.
- Delete selected files by clicking the Delete icon.
- Click the Gallery icon to display all supported image files as thumbnails in the Image Gallery blade
![]() Spread
Spread
The Spread blade enables Nodes to be duplicated within the Data Model. To duplicate a node, first select Spread on the Node Menu.
Within the Copy dialogue box, select the number of copies that you wish to make.
Then select the layout mode for the new copies.
-
- Line Up (Right)
This option will arrange the copies in a line to the right-hand side of the original Node - Line Up (Down)
This option will arrange the copies in a vertical line beneath the original Node. - Radial
This option will arrange the copies in a circle around the original Node.
- Line Up (Right)
![]() Coordinates
Coordinates
The Coordinates feature can be used to change the position of a Node within a Data Model.
When adding a Node to a Data Model, the position the Node is placed will be set within the system. When subsequently loading the Data Model, this Node will be shown in this same position.
To change a Node’s position:
- Drag the Node to the desired new position.
- Right-click the Node and select Coordinates on the Node Menu.
- A confirmation box will appear asking you to confirm your changes. Click “Save Coordinates”
- Once confirmed, you will have informed the system that you wish for Node to always be displayed in this newly confirmed position.
NODE CONTROLS
The Node Menu
Once a node has been added to a Data Model, right-clicking the node will display the Node Menu.
Controls within the Node Menu include:
- Accessing the spreadsheet functionality within the Node.
- Editing Node properties.
- Adding files to the Node.
- Duplicating the Node.
- Repositioning the Node within the Data Model.
![]() Data
Data
Each Node has four spreadsheet tabs. Each spreadsheet is comprised of 100 rows with columns ranging from A to Z (2600 cells in total).
Spreadsheets can be exported to Excel by clicking the Export to Excel icon within the Data blade.
![]() After entering data into a tab, users must click the Save icon
After entering data into a tab, users must click the Save icon ![]() otherwise all changes will be lost.
otherwise all changes will be lost.
![]() Node Management
Node Management
Each node has a Node Management blade that can be used to edit a Nodes‘ properties, Permissions and appearance.
![]() Save icon
Save icon
![]() Node name
Node name
![]() Change Node Type
Change Node Type
This drop-down list allows Users to change the Node’s Type. Note changing the Node Type does not change the name of the Node.
![]() Node Type Properties
Node Type Properties
Displays the Node properties that have been defined on the Node Builder blade. Property values highlighted by a red text box are required fields. A red Node status mark is displayed adjacent to a Node if a required field is not populated.
![]() Custom Properties
Custom Properties
Users can add custom property names and values for each Node.
![]() Node Image
Node Image
Select and display an image for the Node by clicking Load Image. The image selected from the Image Gallery is displayed.
Click the Choose icon to select a new Node image.
![]() Layer Controls
Layer Controls
Edit the Layer assigned to the Node.
![]() Node Description
Node Description
Add/edit a description for the Node
![]() Lock Node Management
Lock Node Management
Prevent editing of fields on the Node Management blade by selecting Lock Node Management. Editing rights are assigned by selecting at least two and no more than three ‘User’ names. A blue Node status mark is displayed adjacent to a Node that has been locked. An ‘Admin’ username can always be selected and added to the list. When no names are present, all fields on the Node Management blade are editable. The Notes field is always editable.
![]() Lock Node Position
Lock Node Position
Fix the position of the Node relative to other nodes within the Workspace by selecting Lock Node Position. Choose at least two and no more than three ‘User’ names. The lock icon on the Node menu is shown as closed to all Users whose name does not appear in the Lock Node Position field. An ‘Admin’ username can always be selected and added to the list. When no names are present, all Users can fix the position of the Node.
![]() Notes
Notes
The Notes field enables Users to leave comments. When content is saved to the Notes field a yellow status mark is displayed adjacent to a Node. Clearing the content clears the mark.
![]() Files
Files
The names of files that have been uploaded to a Node are listed on the Files blade. Selecting a file from the list of files opens a Document Preview blade.
Document Preview is limited to files that are less than 5MB in size. A ‘Preview Unavailable’ message is displayed for file types that are not supported.
- Click the Upload icon to open the Upload Files blade.
- Download selected files by clicking the Download icon.
- Delete selected files by clicking the Delete icon.
- Click the Gallery icon to display all supported image files as thumbnails in the Image Gallery blade
![]() Spread
Spread
The Spread blade enables Nodes to be duplicated within the Data Model. To duplicate a node, first select Spread on the Node Menu.
Within the Copy dialogue box, select the number of copies that you wish to make.
Then select the layout mode for the new copies.
-
- Line Up (Right)
This option will arrange the copies in a line to the right-hand side of the original Node - Line Up (Down)
This option will arrange the copies in a vertical line beneath the original Node. - Radial
This option will arrange the copies in a circle around the original Node.
- Line Up (Right)
![]() Coordinates
Coordinates
The Coordinates feature can be used to change the position of a Node within a Data Model.
When adding a Node to a Data Model, the position the Node is placed will be set within the system. When subsequently loading the Data Model, this Node will be shown in this same position.
To change a Node’s position:
- Drag the Node to the desired new position.
- Right-click the Node and select Coordinates on the Node Menu.
- A confirmation box will appear asking you to confirm your changes. Click “Save Coordinates”
- Once confirmed, you will have informed the system that you wish for Node to always be displayed in this newly confirmed position.